


Formerly called Adwords, Google Ads is a revolutionary platform that has helped countless businesses grow exponentially and scale their sales operations to a huge extent.
When I visited Google Ads the first time, just like most of the people, I didn’t understand a single thing in the interface. There are all these terms like CPA, ad groups, keywords, bidding, extensions, and whatnot.
It’s easy to get lost in these concepts. Or the worst, spend money on running ads that you don’t even know are right for your business.
Google Ads does seem like a complicated platform for starters and I am sure most of you felt the same way the first time.
INTRODUCTION
Let me tell you this. Google Ads is not as complicated as it seems. Running ads is as easy as anything. I mean if you are in haste, you can just set up a few headlines, a description for your ad, a URL for people to click on, select your budget and that’s it. There’s an ad for your business.
Google Ads can be a whole new breakthrough from the existing digital ad methods. It’s a whole new ball game from the traditional digital ad methods and there’s actually a LOT to it.
Businesses and enterprises mess up their ad campaigns every now and then, and it’s pretty normal. I mean we aren’t so familiar with the platform that we could put every good feature to use, right?
But what if I told you that when you finish with this guide, you would know a lot about effective ad campaigns and how to dominate the SERPs with your ads, grab that top position, and leave your competitors high and dry?
In this guide, I would be telling you a lot more than just running ads. Instead, you would be learning how to effectively use Google Ads and boost those conversions and sales for your business. Let me assure you this – By the end of this Google Ads guide, you would know how to do the following things:
- How to run ads on Google Ads?
- How to target specific locations?
- How to put the latest Google Ads’ features to your use?
- How to run effective ads and campaigns?
- How to use extensions in your ads?
So, if you are ready, let’s try to understand Google Ads better!
STAGE 1: UNDERSTANDING GOOGLE ADS
Just like most of the platforms that Google offers, Google Ads is pretty similar as well. You can begin by making your account.
And if you want to speed things up, you can just log in with your existing Gmail account and that’s literally it! You would straight away be taken to your dashboard where you are set to start creating your first ad.
But before we proceed, let’s understand what Google Ads is and how your business could expand with Google Ads.
Why run ads in the first place?
For any business that just can’t find the time to work on its organic reach, running ads is the perfect solution.
Suppose you own an online clothing store that’s featuring new discount deals on Black Friday.
Now, there’s no way that you are going to optimize your content around keywords like ‘Best Black Friday Deals on T-shirts’ and expect it to be featured in the SERPs on time.
Rather, a smart approach would be to run ads around the same keyword, have it displayed on the top of the search results and target specific locations where you can ship your products to boost your sales. Easy, right?
If you are a small business that can’t practically wait to grow organically, running ads is always a smart move.
With some daily budget and effective strategies, you too can run ads and grow your brand.
Google Ads: Is it the right choice?
Even if you are just getting started with Google ads and have a budget to spare, use it to market your business and run ads.
I have seen a lot of business owners complain about how they lost money with their very first campaign and never bothered to try again.
It’s common to lose money on campaigns and marketing. At least you never know what works for you until you don’t try.
When running a digital marketing campaign, common fear business owners have is if it’s the right channel for his business to increase sales and if they could make profits.
But something’s different with Google Ads that most of the other platforms can’t offer. When used the right way and put every feature to your use, almost any business can grow with Google Ads. And I am not talking about just a few extra dollars in profit, I am talking about two or three times the money you spend on ads.
On average, most of the businesses have witnessed a 200% Return of Investment (ROI) with Google Ads.
I think it’s safe to assume that you have a pretty good chance to grow your sales and conversions with Google Ads.
Google is changing
Google Ads have been around since the year 2000 and since then, a lot has changed. It has only grown to help businesses grow exponentially.
One of the most important features of Google ads is its diverse nature. Ads seem to be a part of the website/applications a user is running.
Google has 4 major places where it can display ads:
- Display Ads
- Video Ads
- Search Ads
- App Ads
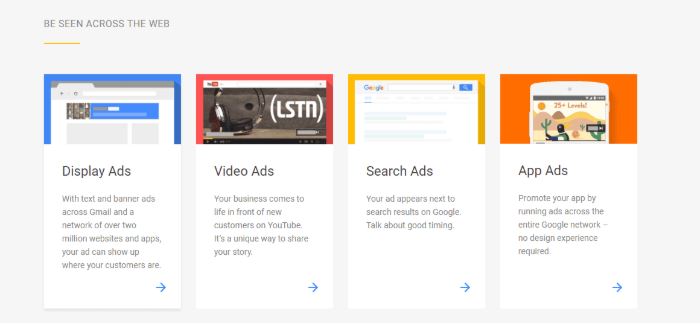
Out of these types of ads, I talked about Display Ads in my guide on ‘earn money from wordpress’. However, to brief it for you, ‘Display Ads’ include those ads that you usually see as banners and leaderboards on the websites you visit. These are a part of Google AdSense.
Second, are the Video Ads that you find on YouTube. Yes, the ones you usually skip. Those are the video ads where businesses run their video ads and market their services and products.
Third, are the search ads that appear within the SERPs for a particular keyword, practically next to them. Since these are the most effective types of ads to set up, they are widely preferred.
Lastly, app ads allow you to advertise on different Google network-based applications. Ads are displayed within applications to reach more viewers. You can see such ads running on Reddit and different news applications.
With Google focusing more on businesses and enhancing marketing campaigns, it has managed to uplift a lot of businesses recently. A common example of this was the introduction of the new ‘Shopping’ tab that features products from different websites for a single keyword, thus providing a unique shopping experience of its own.
I believe this approach is one of the best efforts towards connecting a seller and a buyer. With the availability of options from different shopping portals, there’s no need to jump from one platform to another and finally find the product you were looking for.
STAGE 2: PICKING THE RIGHT CAMPAIGN SETTINGS
It’s time for us to finally start making ads and since we are starting from step 1, let’s make our way through the signup page of Google Ads and create your account. You need a Google account to be able to create your account.
And soon after the creation of your account, you are going to see a dashboard where your ‘Clicks, Impressions, Avg CPC and Cost’ would be displayed along with a bunch of features. Now, don’t get confused. I am here to explain.
With the abundance of features on your dashboard, you are likely to run around in circles and reach dead ends. However, from this step onwards, I will tell you exactly what to do and explain everything step by step. Keep on reading.
STEP 1: We would be starting by clicking on the ‘New Campaign’ button on our dashboard. It looks something like this.
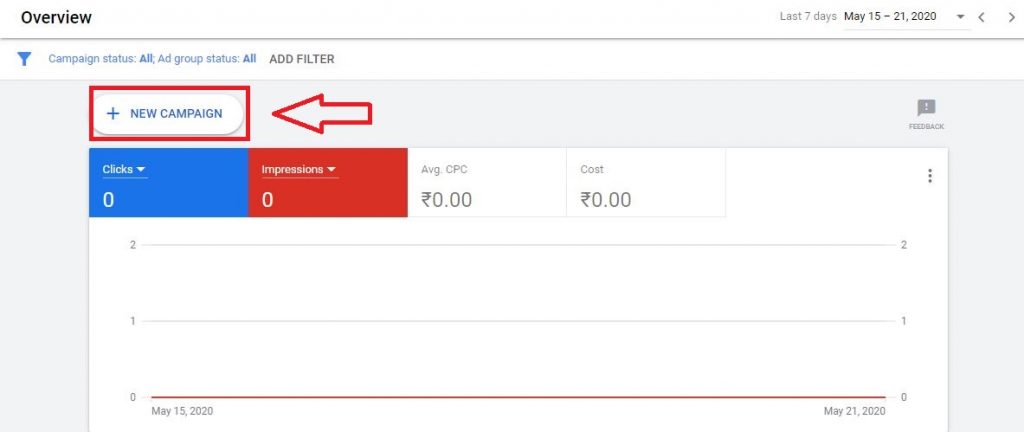
So as soon as we click on it, we are taken to a page where we have to specify what exactly do we want from our ad.
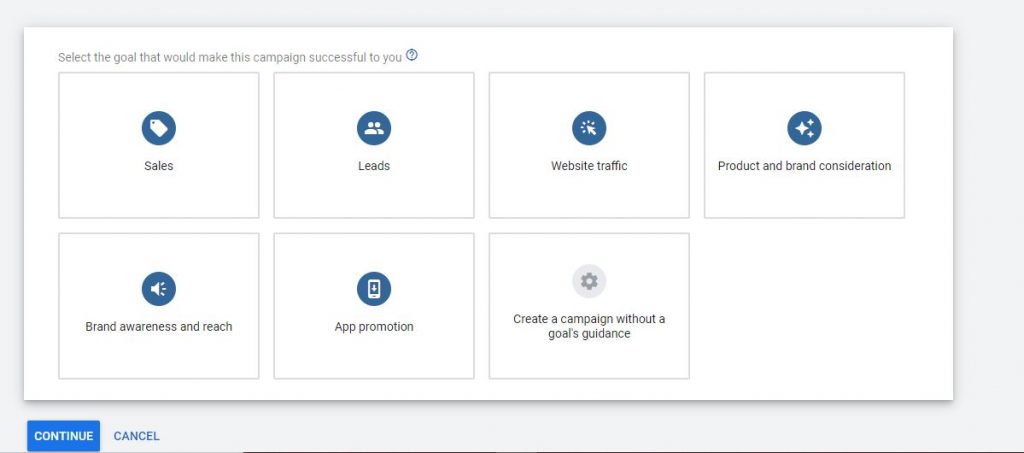
Let me explain each of these elements to you.
Sales – If you are a business or an enterprise that’s selling a product or service, this is the right option for you. With Sales, you are able to set up your ad in such a way that you can focus on driving more users towards your product and make them purchase it.
In the sales section, our main goal isn’t traffic, since that’s not what we are targeting. We need sales and such users that could potentially buy products/services from your site.
Leads – If your target is to achieve more leads and conversions with your ad, then this option is the best for you.
To convert your viewers into customers, Google Ads has a lot of features to influence your ads in the same way and make it more clickable.
And just like sales, our main goal here is conversion rather than clicks and views on our ads.
Website Traffic – Website Traffic is just as it sounds. If your goal is to get the maximum possible clicks on a particular keyword you are running your ads around, this target is the best option for you.
Suppose you have a blog or a website that you want to rank on top of the SERPs and the organic traffic is not something that you’d want to worry about; you can run ads around the same keywords without necessarily having to optimize your page for ranking on the first page of the search results.
Product and Brand Consideration – Making your customers aware of the products and services you are offering is usually a great way to get more customers. If that’s your goal, choose this campaign goal as your default and get customers to consider your brand when they are researching related products.
In such cases, conversions or sales are appreciated, but clicks and views aren’t so bad either.
Brand Awareness and Reach – If your goal is to reach more customers and build an individual identity of your business, choose this campaign.
Often, enterprises or businesses focus more on outranking their competitors just for the sake of getting their name out there in the open. While you might not necessarily be selling anything in such campaigns, but you definitely get the attention towards your brand.
In these types of ads, clicks and views matter the most.
App Promotion – Just like sales, app promotion also drives a customer towards checking out a product/service. However, in this case, the products are replaced by apps that a user would want to download.
When app promotion is the goal, the ultimate goal is to get more app installs. In such a campaign, views from users don’t really matter if the app isn’t installed.
You also get the chance to mention if your app is meant for Android or iOS. That way, an Android user won’t be served with the apps for iOS apps and vice versa, thus saving you money.
Creating a campaign without a goal’s guidance – If you aren’t really sure what your actual plan is with your ads YET or what kind of campaigns you want to run, you can click on this option.
Don’t worry though, because you can set up the same options later on while creating your ad.
Since all this is clear, let’s move to our next step.
The next step is to decide which of these campaign goals would be successful for you. Just for the sake of argument, let’s assume that I am unsure as of now what exactly I want to accomplish with my ad or I might not know about how to choose the right steps now.
So, let’s not choose anything specific as of now and settle for the last option i.e. “Create a campaign without a goal’s audience“.
STEP 2 – Click on the marketing campaign of your choice.
Now, you will be asked to choose what campaign type you prefer.
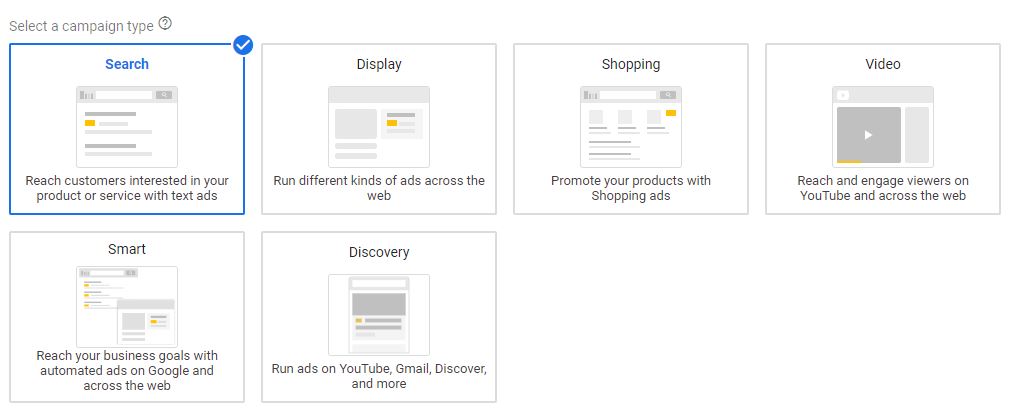
This segment features some of the common locations Google displays its ads.
These are:
- Search – Make your ad appear somewhere within the search results.
- Display – Make your ad appear across pages on the internet, usually sidebars, headings, or between texts.
- Shopping – Make your product appear in an ad within the Shopping tab of Google (which we talked about in our previous section).
- Video – Make your ad appear on YouTube and other places on the web.
- Smart – Make your ads automatically appear across search results and other pages on the internet.
- Discovery – Make your ads appear on YouTube, Gmail, and the Discover tab.
Moving on, now we have to choose how to reach our goal.
Since the Search tab is where we want our ad to be featured, let’s choose ‘Search’ as our campaign type.
STEP 3 – Next, choose how you would like to reach your goal.
Since we are already set up with what type of marketing campaign we prefer, it’s time to decide what our mode of getting a customer to reach our page would be.
This includes choosing the modes of reaching out to the landing page. In my case, I clicked on ‘Search’ and was provided with 4 options:
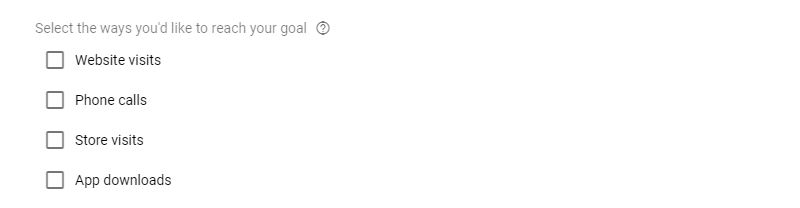
These are pretty easy to understand.
Website Visits – If your ads are directed towards your website, this is the right option for you. It allows you to specify where you want the visitors.
Check the box and you’d be asked to enter the website URL and enter the homepage URL.
Let’s just say I am running ads for Amazon.in. So, I would enter the same URL.
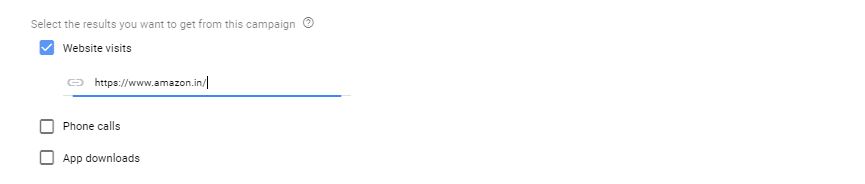
Phone Calls – A lot of times, businesses depend on phone calls and other communication services in order to interact with customers. In fact, phone calls are actually a great alternative to make your brand’s communication transparent and be able to interact with customers frequently.
You can easily use phone calls as an option to be able to reach your goal. Just enter the location of your business and the contact number where you want people to reach you and display the same in your ad.
Even if you don’t set it up yet, you can always do it further in call extensions when we talk about those further.

App Downloads – Finally, we have to finalize if we have an app for our business or not. If you have one, just specify what platform your app is available on and select it. You can even find it in the list of applications available.

Note: If you have all these options for your business, feel free to feed them all. It’s only going to make your ad more attractive and full of details. Even if you skip these steps in the beginning, you can always set them up later.
STEP 4: After we are done with all this, click ‘CONTINUE’ and you will be taken to the next page.
As we move on, we are redirected to the next page.
GENERAL SETTINGS
You can change your campaign settings in these few steps as well.
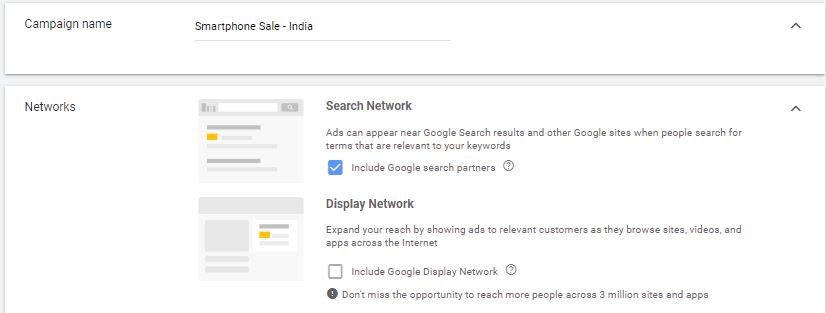
STEP 5: Give your campaign a name.
Campaigns are like the categories of your website. Suppose you have a category ‘Mobiles’ in your website. You can set up a campaign for those ‘mobiles’.
Further, your sub-categories count as your ad groups. This means that if you have a sub-category such as ‘iPhones’ or ‘Android mobiles’, you can practically create ad groups for those products.
Again, this is no hard and fast rule, but definitely feeds value and effectiveness to your marketing campaign!
So, let’s call our campaign ‘Smartphone Sale – India‘. Just to make it more understandable for us.
STEP 6: Next, we have ‘Networks’ where you can choose if you want your ad to be seen in the Search network or the Display Network.
If you want it to be shown at both the places i.e. Search Network and display network, you can choose both the options.
By default, Google recommends you go for both options.
But, I just chose the search network and excluded the display network. Why?
Let me explain!
If you are targeting display networks as well, your ads are eligible to be shown across websites that run Google AdSense. This means, your ads would be featured across multiple websites rather than just search networks.
While this may be a good thing that builds your reach and get your more potential customers, this is really not what we are targeting.
Our main goal is search advertising and we are serving them with ads that they would be interested in. If a user wants to buy a pizza and searches for ‘buy a pizza’ in Google, we want to show them ads about our pizza store. Since they are interested in buying a pizza (which invited the search in the first place), they might potentially end up buying pizza from the ad that you are displaying for your store.
Display networks, on the other hand, might show personalized ads, but they aren’t as effective as search network ads. Sure, they might be good for your business, but these network settings can’t be combined at all.
At this point, you can go on further, but there are a few more options that you can set up in order to customize your ad thoroughly. Click on ‘Show More Settings’ and you will be displayed with 3 more options.
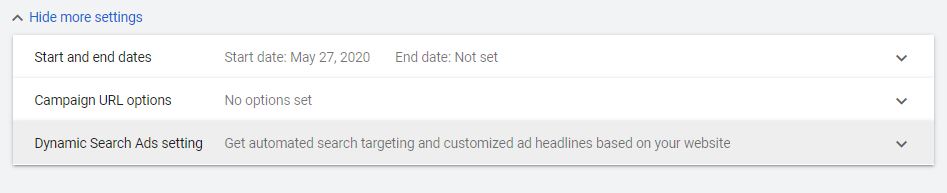
Start and end dates – This feature is just as it sounds. You can specify what date you want to start your ads on. By default, there’s no end date to your campaign, but let’s say you want to run ads for a particular time period, say a month, you might want to specify an end date as well.
Campaign URL options – ‘Campaign URL options’ is a new feature in Google Ads. You really don’t need to set it up. But since we are on the topic, let’s just go through it briefly.
The campaign URL option allows you to set up a tracking template for your ads. This template is a helpful feature if you want to track the source of the clicks your ads are receiving. It even helps you specify URL parameters. These help you gather more information about devices and keywords that drive clicks to your ad. If you plan to run similar campaigns in the future where you want to compare every element of your ad against the other one, this feature could help you sought what helped you generate more clicks.
Dynamic Search Ads Setting – Dynamic Search Ads are a great option if you have a huge website whose ad campaigns you want to run but just can’t find the time to manually set up ad campaigns for every part of your website.
Basically, when you allow dynamic search ads in your campaign, you are giving Google the authority to automatically create ads for your website.
With dynamic search ads, Google is going to use the index of your site or the page feed URLs that you have given to create ads in the auction on its own. You can understand it as a campaign that is set up for you based on your website.
Dynamic Search Ads are an important part of an ideal ad campaign for huge websites. However, if you are running ads for like the first time or don’t want to run multiple ads about different categories of your products, you might as well want to skip it. Also, if you don’t have a lot of data on your site, don’t use this feature.
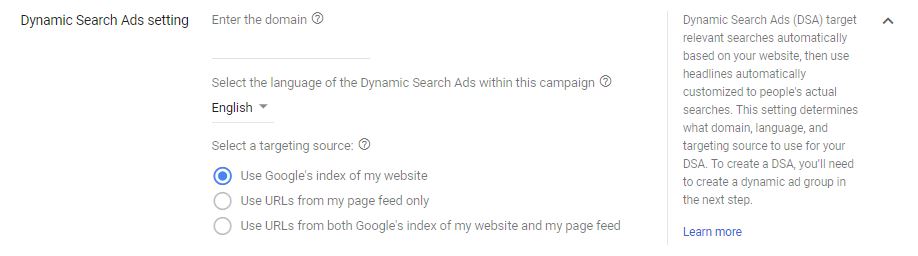
Since our account is new, out of the three options, we are only allowed to choose the default option. After you create ad groups for your site and specify the URLs in the coming steps, you can also start creating automatic ads based on just the URLs you want.
Assuming we are running ads for a small site or business, we won’t be using this feature for now. So, it’s safe to move on without entering the necessary details here.
TARGET AND AUDIENCES
STEP 7: Now, we select our target and audiences. In this segment, our first step would have to choose the locations that we want to target our ads.
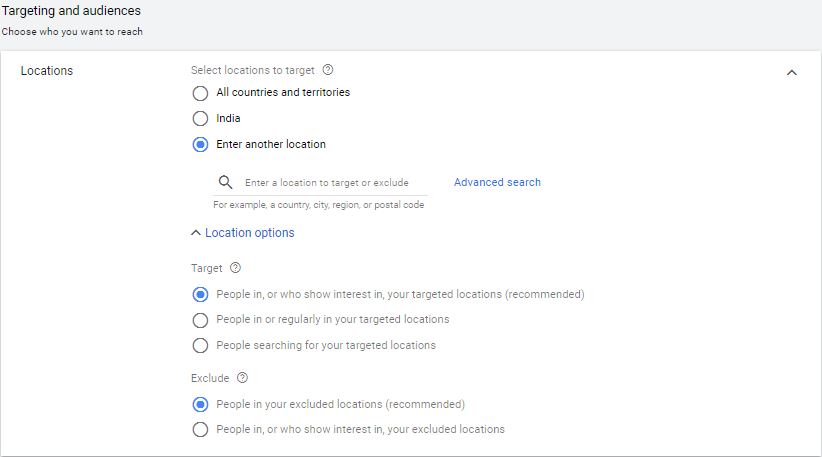
Choosing a location is an important part of running an ad. If you are running a business in India and have mentioned your target location as the USA or some other country, you can actually mess up your campaign.
By default, we are allowed to choose either ‘All Countries and territories’, or a particular country that you mentioned on the last page. In my case, it displayed ‘India’.
Now here’s a catch.
It’s fine if you are featuring your ad throughout the entire world. Say if you have a business that ships worldwide, then you can go ahead and choose ‘All countries and territories’. And let’s say you ship your products in a particular country, then you can choose it accordingly as per the given options.
But what if your business doesn’t deliver products in a particular state or region? It’s obvious that if you run ads within that region as well, it’s just a waste of money.
This is where ‘Advanced Search’ comes in handy.
Let’s say I deliver throughout India, but my services aren’t available in the Delhi state. So, I would want to exclude that location.
This means that I will target the entire India and exclude Delhi.
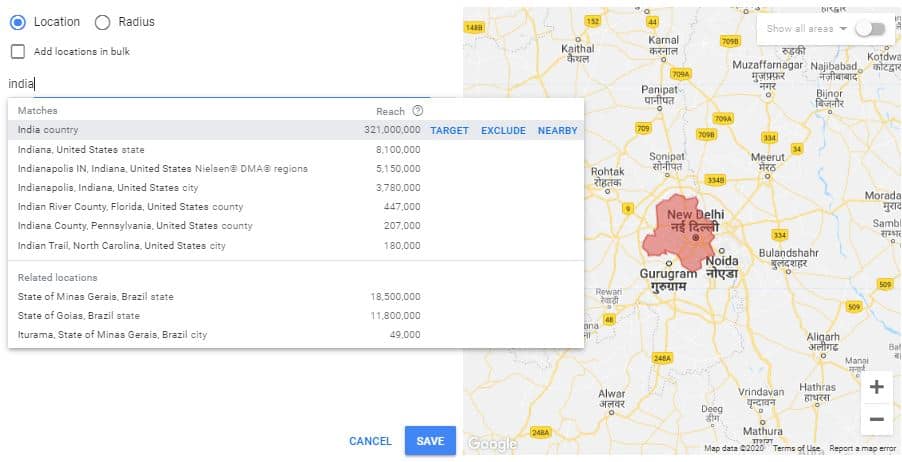
You can start by entering the name of the state in the ‘exclude locations’ box.

As the matches appear in the search, you can simply click ‘Exclude’ and that area would be excluded from the list of locations where your ad appears.
And on the map, it would show something like this.
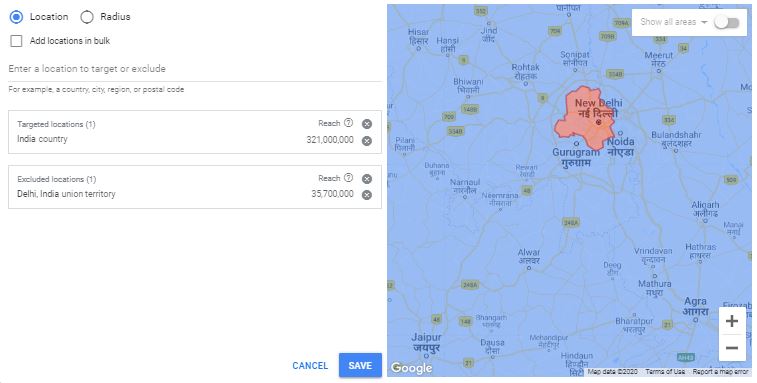
In our location settings, we can add or exclude specific locations. The locations that you target are represented in blue color on the map and the ones that you exclude are marked in red color.
You can even use the same feature to target particular locations and exclude different locations. And, with the nearby option, you can see different vicinities and regions in that particular state that you can target.
STEP 8: Choose what people to target among the list.
Right after our location option, we can target what people to target with our ad campaigns and who to exclude.
We are given three options which are:
- People in, or who show interest in, your targeted locations
- People in or regularly in your targeted locations
- People searching for your targeted locations

It’s really obvious as to what options would be best for you. But you might realize that I have checked the second option even though the first target was recommended to me.
Let me tell you why.
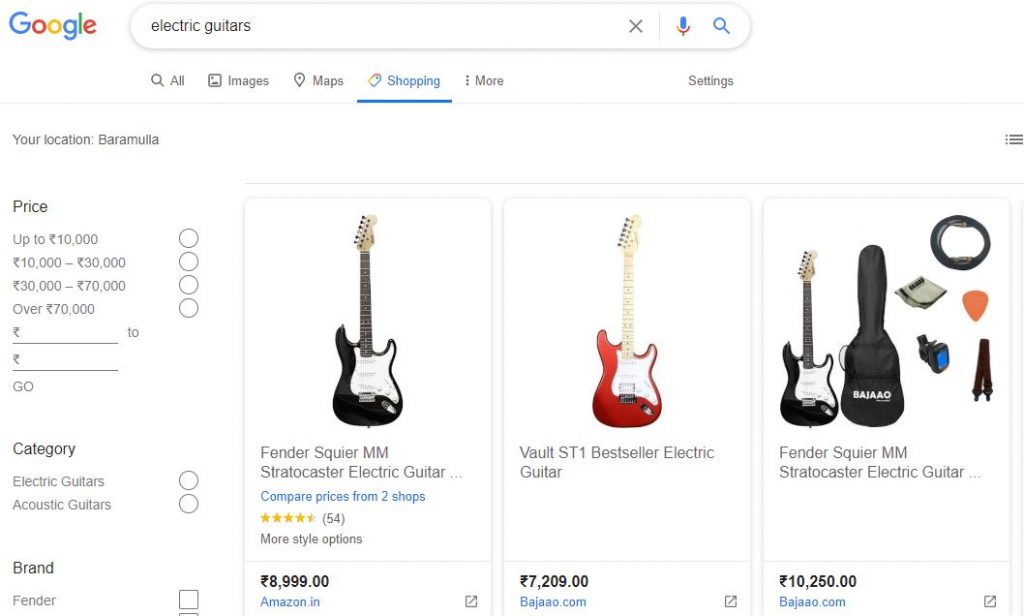
When you chose the first option i.e. People in, or who show interest in, your targeted locations, you are practically displaying your ad to people outside your target location as well. How? Suppose a person lives in a different region that you aren’t targeting, say Canada and they are searching about a specific product in a certain location, like ‘buy electric guitars in India’. Your ad is eligible to show to them because they were interested in your location. This practically has you spending more money since you are even targeting people that are showing interest in your location.
In this option, the person doesn’t actually have to be in any of your target locations to see your ad. As such, if it doesn’t qualify as requirements for your ad, DON’T USE THIS OPTION.
People in or regularly in your targeted locations – This option is more transparent and effective. If you enable this option, you are showing your ads to people that are physically located within the areas that you are targeting.
This means that even if they show interest in your location, the ad won’t be displayed for them because they aren’t in your location. This actually is a great option to save money and have more control over your ads.
People searching for your targeted location – If you choose this option, you are making your ad eligible to be shown to everybody that’s showing interest in your targeted location.
In such cases, the actual physical location doesn’t matter at all. While it may not be an ideal option for most of the businesses, but if you are targeting clicks and views over sales, I say this option won’t be a bad choice.
Exclusion options
Since you are trying to have as much control as possible over your ads, it’s a great idea to specify exclusion options in your ad and make it more precise and effective as possible.
By default, Google Ads provides you with two options:
People in your excluded locations – In this option, you are basically just excluding people that originate from the locations you have excluded. Since I excluded ‘Delhi’ in my locations, my ad won’t be displayed to people that are from Delhi. It’s a very transparent strategy and Google recommends it as well.
People in, or who show interest in, your excluded locations – For you to understand this option, let’s use an example.
Suppose your keyword is “Chordless electric guitars for sale” and you are excluding Delhi, then your ads won’t appear for the same keyword if the user is in Delhi. It won’t also be shown to a user that’s in a different state and searches for “Chordless electric guitars for sale in Delhi”.
STEP 9: Choose the languages you want your ad to be served in.
This is a plain and simple step. All you have to do here is to specify what language group you want to target. If you want to target English-speaking users, you can select English (which is actually the default option based on your account).
The same goes for other language groups as well.
If you have chosen a specific language, say Hindi, your ad would be displayed in the Hindi language to such users that have the Hindi language as their default.

This is a good option for targeting particular language speaking groups.
STEP 10: Select Audiences to add to your campaign.
This section of your ad is basically what makes your ad more informative and precise.
When you have a specific audience to target, you are basically telling Google to display your ad to only that criteria that you have specified.
You can specify certain options to make your ad more precise. Google does allow you to target in-market audiences since it’s what most of your competitors are doing. You can target ‘product categories’ for starters. If a user is interested in different categories of products, say consumer electronics, mobile phones, or other things, you can build your ad around that very search.
With audiences, you can choose either of the two options:
- Target all kinds of audiences you want. However, you can also adjust bids for different types of audiences. You can also go back to change any details, even after your ad is running.
- Target a specific audience and exclude others (based on targeting mechanism where you would target specific keywords, visitors, or searchers). This is a good option if your budget is low or if you want your ad to be displayed only to a specific audience that could be interested in your products.
By default, you can target people based on their interests, affinity and customer affinity, remarketing, in-market audiences etc. It really is a broad concept and I could dedicate entire chapters to these concepts. But, since we are just getting started with our account, it’s safe to skip this option.
You can target the following types of audience:
Specific Category Interests – Google serves personalized ads to users who have been showing interest recently around your product category or other similar pages.
Remarketing lists – Ads are served to say, such visitors that have seen a specific page on your site but not necessarily bought anything. You can re-target such visitors easily.
Demographic Targeting – As the name suggests, you can target specific demographics of people and display ads accordingly.
Note: You can find and customize all these options in the Audience Manager tab in ‘Tools and Settings’ at the top of your dashboard.
If you want to narrow your ad serving to a very specific category of people, say college students, parents, married couples or any such section of the society/institutes that people have something to do with, you can select that in this section.
Again, before you even narrow your search, take note of the fact that the narrower you are with your ad targeting, the less effective your ad is going to be!
So, keep the default option as observation only! No need to change it for now!
Next, we have the targeting settings that allow you to control what criteria narrows your reach and make your ad more effective. You have two options by default:
Targeting – This option allows you to channel your ads towards specific criteria of products or similar factors. You can also adjust bids on criteria.
Observations – It reports how your ads have been performing on the criteria you have selected. It’s a good option to check the performance of your ads and create ads accordingly in the future.
BUDGET AND BIDDING
In this section, we specify our budget and bidding costs. It’s a more detailed approach but you can definitely save a lot of money with the right options.
STEP 11: Select your daily budget.
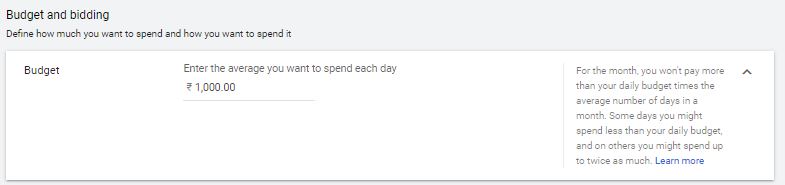
In this step, you can manually enter how much allowance are you providing for a single day for your ads. Note that budgets are set for a daily basis rather than a monthly basis.
This budget would further be used to run ads based on your preference. Sometimes, you might be charged less for your ads based on the activity around your ads.
STEP 12: Choose your bidding strategy.
Before I start this segment, let me explain ‘bidding’ a bit.
Bidding is a common concept that allows you to have more control over your ads. It allows you to configure how much you would be willing to pay for a conversion, the amount of traffic your ads will receive along with the Return on Investment (ROI) they can generate.
The more money you spend on bidding, the more clicks you are going to get. And if you spend less on bidding, you are obviously going to receive fewer clicks.
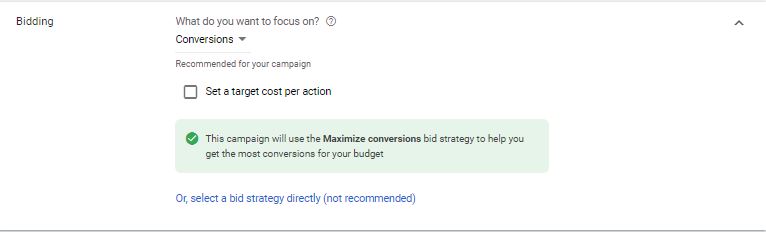
When choosing bidding options, by default you are provided with targets such as conversions or clicks. But, there’s a lot more to bidding than just this.
If you select any of the default options, like clicks, impressions or conversions, your ad would automatically be optimized to try to reach those targets. Google does it on its own. Mostly it performs its job, but you really don’t know what it does exactly. Plus, for specific ad groups, it might perform better and for some, it won’t.
That leaves you with the option of taking things in your hand and selecting a bid strategy on your own which Google doesn’t recommend (as shown in the screenshot above). The reason for this is that if you don’t know what you are doing, your ad is not likely to perform better as you’d expect.
But if selected right, these bidding strategies as going to make your ad the most precise and generate exactly the same results as you would want it to.
Since money is involved, you would want to be smart with this approach. So, let’s try to understand what kind of bidding strategy could suit your campaign the best.
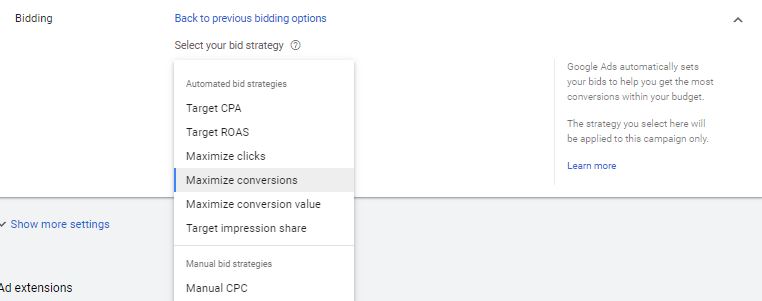
We have the following bidding strategies –
Target CPA – The main objective of Cost per Acquisition or CPA is to get the maximum possible conversions. CPA is an automated bidding strategy that does sound like Cost-per-Click (CPC), but here, the main goal is to get clicks that convert at a profitable cost.
The cost of a click doesn’t matter at all.
You are allowed to set bids for getting as many conversions as possible and that too without exceeding the cost-per-action you set. It’s a really good option when you have a limited budget for specific conversions and don’t want to spend extra on specific conversions.
Target ROAS – Return on Ad Spend or ROAS is exactly how much revenue you are able to generate based on the money you are spending on your advertising.
Suppose you are tracking multiple conversion actions and each conversion action means something different to your company. In such a case, target ROAS is going to help you bid based on how much return you are making on your advertising revenue.
With target ROAS, Google ads automatically set up bids for you in order to get the maximum conversion possible. However, these conversions could have different returns than your budget.
Your ROAS is going to be more effective if you have a good number of conversions on a daily basis. If you are just getting started with Google ads, you might want to skip this target.
Maximize Clicks – This strategy is exactly what it sounds like. If your main goal is to get as much traffic as possible without necessarily worrying about sales or conversions, you can settle for this option.
Suppose you are running a blog or website and want to raise awareness about your services or let’s say you want to increase your blog traffic to get more email subscriptions, you can easily use this option.
You can also set a maximum cost per click bid limit. This tells Google not to spend more on single than your daily bidding budget.
Maximize Conversions – This is the same as the previous strategy. You allow Google to set bids automatically to get the most conversions within your budget.
Your bid is optimized in such a way that the main focus in on increasing conversions over other factors of your site. This really is a great option if all you want to focus on are conversions.
Maximize Conversion Value – This bidding strategy is slightly new yet very effective for retail businesses.
As a retailer, you are allowed to optimize different campaigns you have been running to values like sales revenue or profit margins.
After analyzing the ads, Google then automatically sets bids and tries to bring you the best possible returns on your spending.
This strategy isn’t for conversions alone, however.
Your bids are influenced automatically to meet revenue goals, something that Google does on its own.
Target Impression Share – Target impression share is more like a ‘Get results fast’ technique which actually pushes your ad to the top to receive the maximum impressions possible.
When you use this bidding strategy, you have the option to rank at the following position in the SERPs:
- At the absolute top of the search results.
- Somewhere in the top results.
- Anywhere else on the page.
While this strategy might get you to the top, you should know that you would actually be spending more than your competitors.
You reach the top position by essentially spending more on your bids than your competitors. The more they bid, the higher you are going to bid which could actually make you spend a lot more at times than the revenue you could be generating.
However, this isn’t a bad strategy when you want to market a product or sell something quickly. Suppose we are selling a limited edition clothing line that we want to reach every person within our target location. We can essentially use this strategy to rank to the top of our competitors and make the maximum number of sales possible.
Manual CPC – This is the only manual bidding strategy that you could find on this list.
If you want the MOST FLEXIBILITY AND THE MOST CONTROL over your ads, this is the bidding strategy you would want.
The fundamental of manual CPC is that you pay what you are willing to pay for an ad, no questions. You can also allow enhanced CPC that you can use to help you with optimizing your bids for conversion or conversion value.
However, if you don’t have your conversion tracking set up, you can still use this strategy.
Since you already know what kind of bidding strategy might be right for you here, it’s time to configure some of our final additional settings in our bidding strategies.
Let’s understand all these settings briefly:
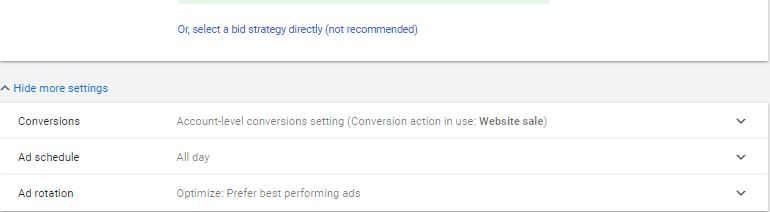
Conversions – This really is more of a reference point for you. These allow you to understand and evaluate what bidding strategies brought in the most conversions for you and how you could plan your bidding strategies in the future ad groups accordingly. Whatever bidding strategy works the best for you and brings in the most conversions, that’s the one you should be targeting.
By default, you have the account-level conversion setting allowed and that’s what you can really choose in the beginning.
Ad Schedule – Ad schedules allow you to run ads during specific days and specific times. Suppose you sell your services on working days and are closed on Sundays, you could easily set up your ads to run only on the working days while disabling them on specific days.
Once you set them up, you can even change them in the future. You have full control over the time you want to run your ad as well.
Ad Rotation – Ad Rotation is an important setting, so don’t miss this out.
By default, you have the following ad rotation settings:
Optimize: Prefer Best Performing Ads – If you choose this option, Google is automatically going to find the ads that have the chance of performing the best and push them over the rest of your ads. This actually is a good option if you don’t actually care about even audience distribution over your website. If your main goal is sales over anything else and every ad you are running focuses on the same thing, then this option is good for you.
Don’t Optimize: Rotate Ads Indefinitely – This is a uniform system of ad rotation by Google that gives equal time to every ad in the SERPs. This means that your ads won’t be pushed on the basis of their performance, but every ad would be treated equally and displayed in the search results.
AD EXTENSIONS
STEP 13: Enable the required ad extensions for your ad.
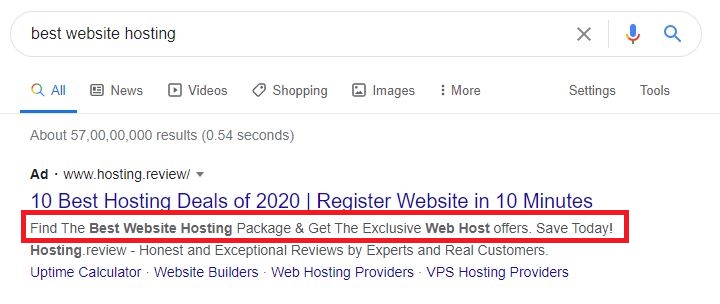
Do you know that Ad extensions could increase your ad Click-through-rate by 15%? That’s an official statistic by Google!
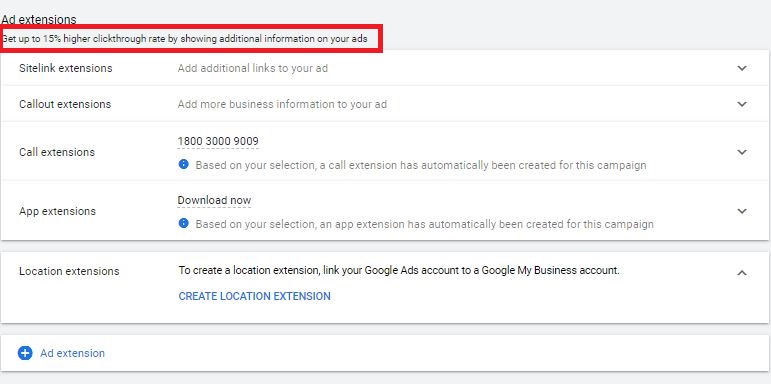
And yes, ad extensions actually make your ad more informative, attractive, increases your quality score and it actually takes up more space in the search results. Trust me, you need that extra space in the SERPs to be able to receive more clicks and dominate your competitors.
So in this section, I will briefly tell you about ad extensions and how you could use them to make your ad stand out from your competitors.
Sitelink Extensions
Sitelink Extensions are the most common types of extensions and I’m pretty sure you might have seen them in a lot of ads.
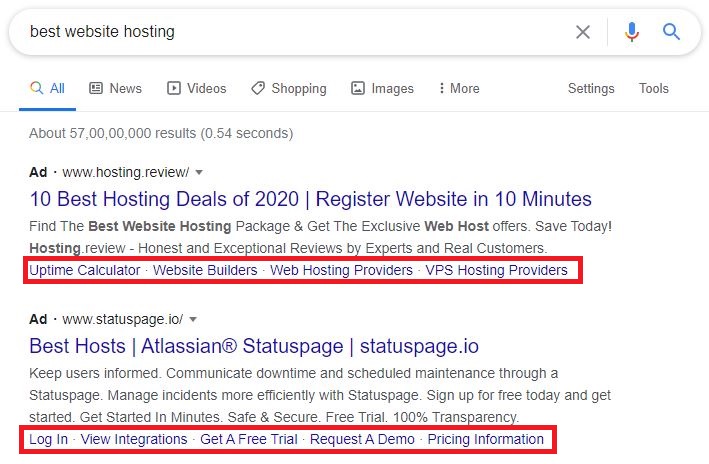
These are the links that appear within your headings and redirect to different pages of your website.
Sitelink ads are displayed with proper headlines and descriptions. You can set a few of them, but only 4-5 of them are displayed within the ad at the most.
These extensions are great to feature pages from your website within the same ad.
Businesses usually display FAQ, Contact Us or Log In pages as sitelink extensions and so can you.
For adding a new sitelink extension, you need to add the sitelink text, two description lines, and a final URL. You can add more than just 4 sitelinks.
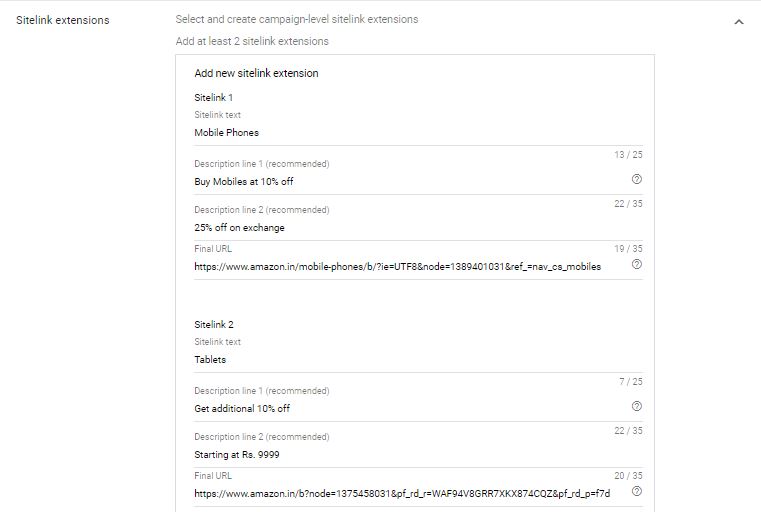
Pro Tip #1: To get the best ideas for what pages to feature in sitelink extensions, you can sort pages by ‘most popular’ in your website analytics and encourage more traffic on them.
Pro Tip #2: Add at least 7-8 sitelinks. This way, Google can rotate them and even you can understand which ones are performing the best and display them accordingly.

Ultimately, you can choose your device preference in the advanced options and optimize it for mobile devices as well. You can even select the start and end date along with choosing the hours you want the sitelinks to be displayed.
Callout Extensions
Callout extensions are popular among businesses to highlight some of their best offers and features that could capture the attention of a user instantly.
Callout extensions have a 25 character limit, so you might want to use catchy words to attract readers.
You can add 10-12 callouts and let Google rotate them to make sure you are getting every detail out there and making sure your audience knows about every service you are offering.
Call Extensions
If you added your contact number in the last section, you would have a contact number added here by default.
Call Extensions are good for businesses that have a contact number. On mobiles, it shows up as a ‘Call’ button.
The best part about call extensions is that you can choose to display the call button during specific hours of the day. This allows you to receive calls only during working hours and actually save you money since nobody is clicking on ‘Call Now’ and costing you the revenue for a click.
Businesses rely on calls the same way they rely on website visits or other things. For a website like Dominos Pizza, a call for an order would be more valuable than a click on a website!
All you have to do is to choose the location of your business, enter your number, set up your device preference and select the start date. For the call reporting, it’s just as it sounds.
You might also want to know that the price for a call is the same as a CPC on your ad. The charges are incurred irrespective of you picking up the call or not.
App Extensions
App Extensions are just as they sound.
They are meant for businesses that also have an official application of their own and want to focus on app downloads as well.
There’s nothing much to it but to just add links to your app, mention if it’s for Android, iOS, or both and choose an anchor text.
Location Extensions
If your business has a physical location, this is the extension you would definitely want to include. It’s a great option for local businesses.
Google usually adds a location extension on its own. So, if you don’t do it and enable locations, your default location would be generated automatically.
However, do remember that you would need a Google MyBusiness Account for adding location extensions.
Structured Snippet Extensions
Structured snippets are quite similar to callout extensions, but these are grouped under a parent category.
Structured snippets give more information about your products/services and could help you dominate more space in the search results.
Structured snippet extensions are more informational than they are promotional, meaning they help you spread more information about your businesses than just generate clicks.
Lead Form Extensions
The lead form extensions are the extensions that show beneath your search ad. It could be seen on mobiles and tablets to allow a user to submit their contact information right through the ad.
Lead form extensions make it more feasible for a user to convert right through the ad rather than visiting the mobile site and converting.
This becomes easier if the user is already signed into his Google account since all their details are filled out with them and all they have to do is to submit the information and it leads to a conversion.
Message Extensions
Message Extensions are a common feature, responsive for mobile devices.
It allows displaying a message alongside an advertiser’s ads on the SERP, making them longer and increasing CTR.
Advertisers can write a message displayed by default for users and encourage conversations.
However, you should know that if a user clicks the message, you are going to be charged and it counts as a CPC.
Promotion Extensions
Promotion extensions are partially similar to callout extensions. They are the best for deals, discounts, and adding extra discount on promo codes. Yes, you can add customized promo codes.
These extensions play an important role in increasing the CTR of your ad.
However, you should know that you need to be accurate with what you display in the promotional extensions as Google reviews these offers before they can start displaying it in the ad to prevent misleading offers.
You can add the start and end dates for your promotion extensions based on the time you are featuring these offers. This actually is a great option for businesses that run regular discounts and promotions.
Price Extensions
Price extensions are a good option when you want to display the price of specific products right in your ad.
Price extensions are great for saving money! How?
Imagine a user clicking on your ad, seeing the price, and realizing it’s not something they can afford. Doesn’t matter if they buy the product or not, your CPC has still been charged.
As such, to save money on CPCs, you can enable price extensions to display the price of products right in your ads. This helps a user find the price of products on your site without even clicking on your ad.
This extension is really great when you are selling anything in your ad.
This was all about your ad extensions.
STEP 14: As we are done with all this, we would save our step and click on ‘SAVE AND CONTINUE’ to reach the next page.
STAGE 3: SETTING UP AD GROUPS
Our next stage is fairly simple to set and needs us to add some basic (YET IMPORTANT) information about our ads.
Since our ad is already set up, we need to specify what KEYWORDS (also known as search queries) would trigger them in the search results.
For this part, we would understand keywords first, and then we will set up the remaining part of our ad.
Keywords
If you have been running your website for a while, you’d definitely have an idea of what keywords are and how Google uses them to present results to a user who searches for them.
Keywords specifically are an important part of our Google Ads campaign since they are the words that trigger our ads to be displayed within the SERPs.
You are essentially going to be using a lot of keywords, but not in the ads.
There are a lot of keywords that are going to be effective, some are going to be profitable, some just for experimental purposes, and out of them, you sort the best ones.
There are a lot of things that are needed to be considered while picking keywords for your campaigns. If you actually spend time researching the keywords and nitpicking the best ones that are suitable for your campaign, you are definitely going to save money, hit the target with your ads, and improve your quality score.
For fitting a specific keyword in our ad and deciding if it’s going to bring us more traffic depends on how much volume it has, how many monthly searches it gets, how much Cost-per-click it has along with other things.
There’s a need for a proper keyword research tool and actually, Google Ads has a really helpful tool, called the ‘Google Keyword Planner’.
You can easily find it in the ‘Tools and Settings’ option in your account.
But, before we discuss this tool and how you could use it, let’s understand how you can get the ideas for the right keywords.
A Quality keyword generating approach
Getting the right keywords has always been a bit of a hassle since a lot of businesses end up going after high competition keywords with low bidding budgets. This eventually leads to fewer visitors and fewer quality scores.
For starters, there are a few approaches as to what keywords could be right for us.
Put yourself in the customers’ shoes – For a second, forget the fact that you are running a business. Think like a customer and search for such terms that lead to your website. Keep a track of all these keywords. Who knows what ideas you will find?
Survey your existing customers – Try to find out what keeps your customers bringing back to you for purchases and what makes your business stand out for them as compared to your competitors.
Approach your departments – Every department in your enterprise has a different perspective on it. When running ads, ask your company what exactly do you want to achieve with Google ads? Is it the sale of specific products, services, and what keywords exactly match your products. These departments can provide certain keyword categories about the enterprise that is the most relevant to them, which helps you distribute this task among more people, thus generating more ideas.
Don’t forget other tools – Sure, Google Keyword Planner might be a good tool, but it isn’t as insightful and thorough as a few other tools. I recommend using Ahrefs that would actually help you understand what keywords your competitors are using and if there’s scope with the keywords you are targeting. Such tools also display if you are ranking for certain keywords already.
Google has really mastered the idea of keyword generating and evaluation for us. With some of the recent updates, finding new keywords has become easier than ever.
In our Keyword planner section, we can see the following options:
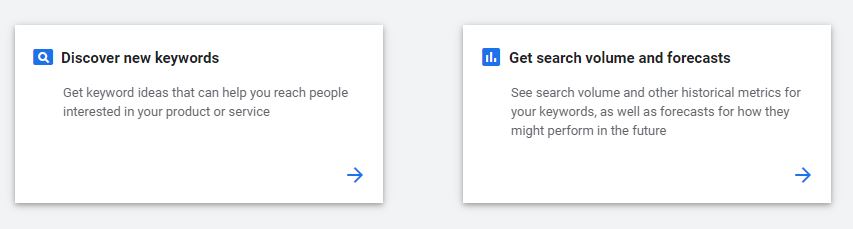
Discover New Keywords.
Get search volume and forecasts.
Discover New Keywords
For finding some of the most relevant keyword ideas, you can use this option. There are two ways to find new keywords.
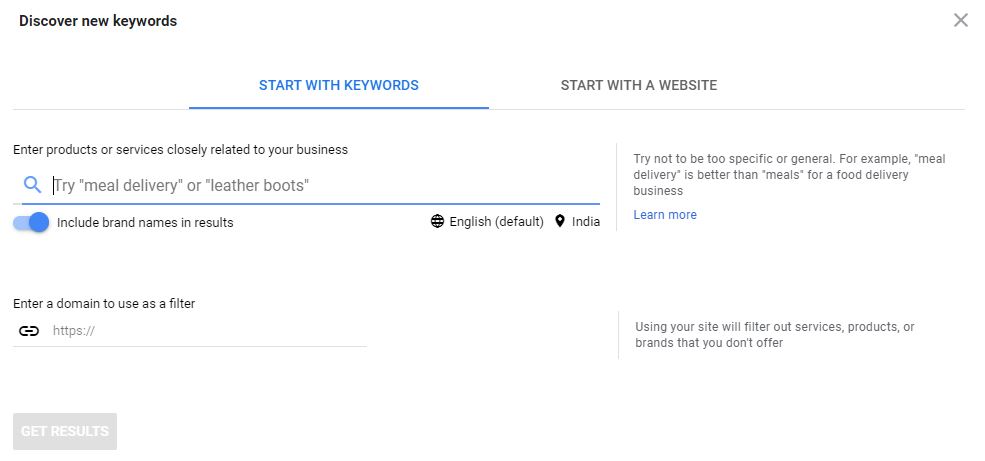
Start with keywords – This is a good option if you already have a few keywords in mind and would want to check how much traffic and searches they receive.
With this option, all you have to do is to enter a few (or even one) keywords and the keyword planner tool would generate information about your keyword along with suggesting you more ideas.
Let’s say, I have a few keywords that I want to target. So, what I would do is I would enter these keywords and wait for my results. You can enter multiple keywords but entering a comma and then hitting enter between your keywords.
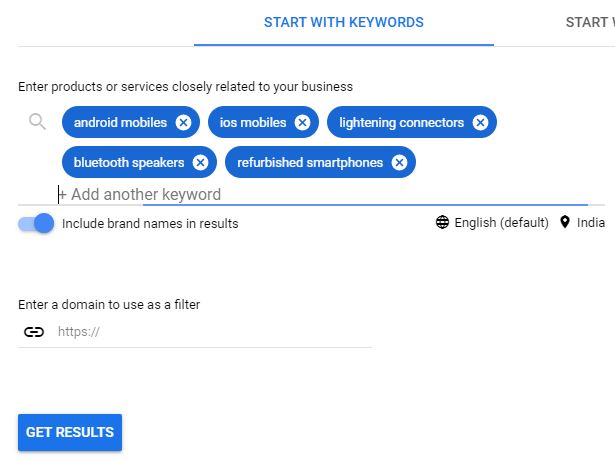
After clicking on ‘Get Results’, you would be displayed with the results you wanted.
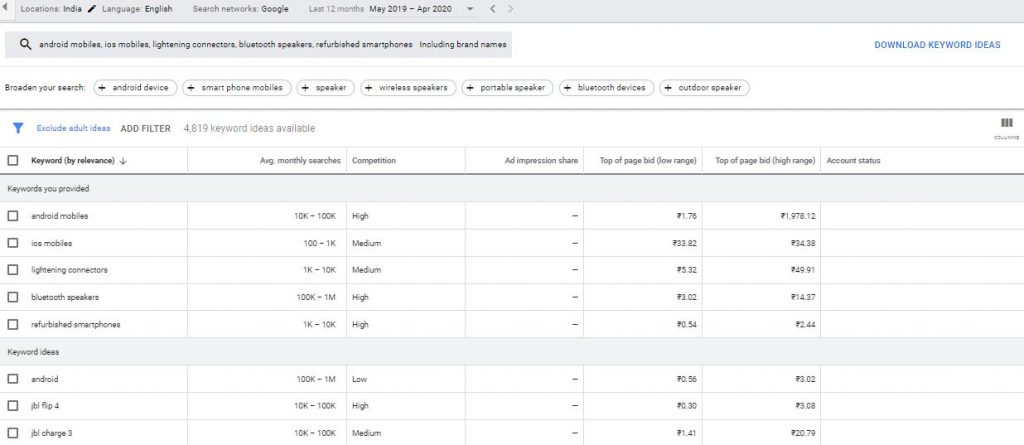
Here, not only can I find how many times my keyword was searched in a month on an average, but also how much competition it has. It even displays the ‘Top of Page Bid’ in a low and high range which essentially tells you how high or low advertisers have bid in the past for getting clicks around the same keyword and how high or less you could expect to pay to appear on top of the page for that keyword.
Then again, it totally depends on the location and search network settings you have kept as default for your ads.
Along with such information, you also get more keyword ideas if you scroll down. This is one of the most common yet efficient methods to get information about the keywords you want to target.
There is also an option of ‘Broaden your search’. This option suggests a few keywords that are similar to the ones you entered.
Start with a website – Here’s a personal opinion; Google keyword planner tool is good, but it’s not as flawless as the rest of the third-party tools. I mean the keyword suggestions could sometimes be so basic that you’d feel like ‘I don’t need a keyword research tool for this!’
Google suggests the same keywords to you as it does to other people. These terms are most competitive.
To save you money, gather some good ideas and actually help you with keywords, this tool helps you in finding some good keywords based on the other sites that belong to the same niche as yours.
This means that if you don’t have the idea of where to start, just enter the URL of a similar website (or the URL of a specific page) and get keyword ideas around those pages.
Here’s what you have to do.
You enter the URL of a similar website or a page. (I will be choosing Flipkart since that’s a similar website as Amazon).
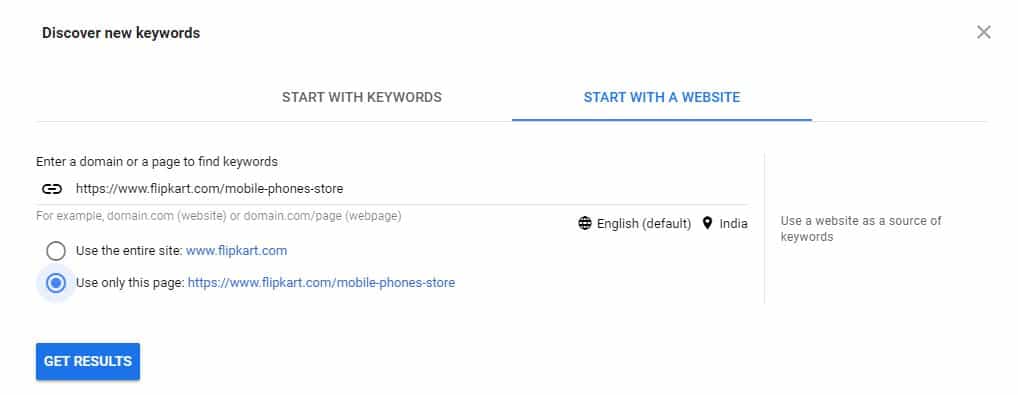
You choose if you want keyword ideas for your entire site or just a page (choose just a page if you want to narrow your keyword ideas) and click on ‘Get Results’.
You are shown the relevant keywords.
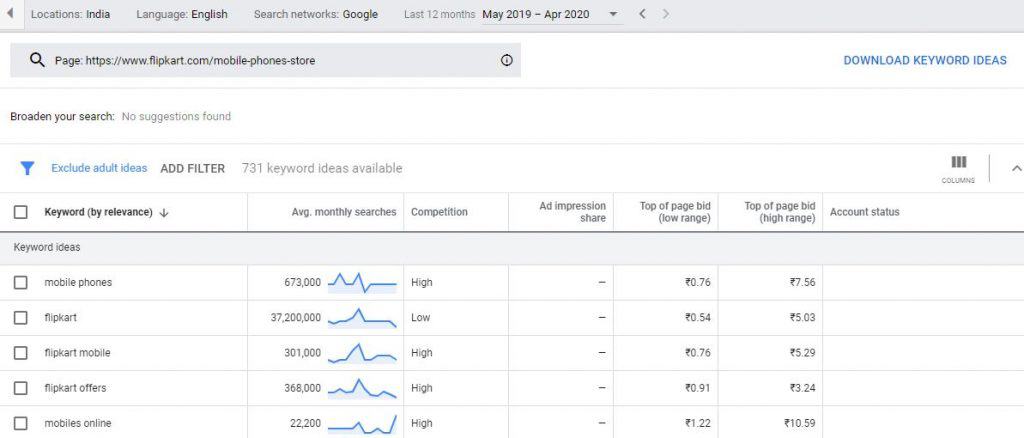
This is the list of the keywords that most of your competitors won’t be able to see since they might enter different competitor sites or different pages.
I recommend this option for beginners who don’t know much about keywords yet and want ideas quickly.
At this point, I’m sure you’d have a common question, ‘How do I choose the right keywords?’
Now that you are already familiar with how Google keyword planner works, finding the right keyword is the next step.
I totally understand that finding the right keywords is hard. But if you understand what factors matter, you can easily find the keywords that suit your campaign.
Here’s what matters the most in my opinion:
Search Volume – It’s obvious, the more search volume a keyword has, the more traffic it’s likely to receive. However, you should also know that the CPC of such keywords is always more than the keywords that have a low search volume.
Keyword Competition – Google Keyword Planner also shows the competition of a keyword from high to low. Choosing among these keywords totally depends upon your budget. The more competition a keyword has, the higher would the CPC be.
Organic SEO competition – This will require a more manual approach. You would have to check what your competitors are doing better than you and how you could outrank them. Right from ensuring On-Page SEO to building a great landing page, everything matters.
Since we are done with this part, let’s get to know about the second tool of Google Keywords Planner, known as ‘Get search volume and forecasts’.
Get Search Volume and Forecasts for your keywords
If you have a long list of keywords and are curious as to how they are going to perform, this is the right tool.
Note that this tool won’t give you any keyword ideas. Rather, it would just help you forecast as to how they would perform in the future.
You simply start by entering a few keywords you want to know the search volume for and click on ‘Get Started’.
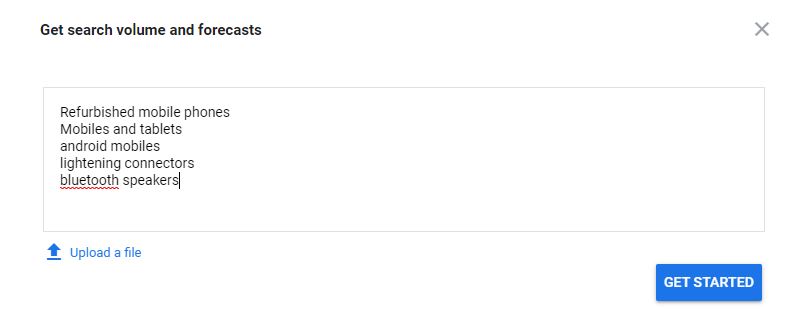
You would be displayed with the forecast of the keywords that you entered.
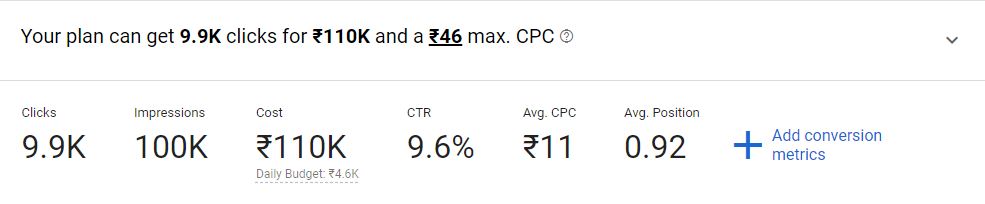
This really is a simple strategy that you could use to estimate your budget and what to expect when you spend that budget. You can plan your move accordingly.
However, one thing that I would like you to note is that some keywords are seasonal (like ‘independence day sales’) and such keywords might have an expensive CPC. I recommend you thoroughly evaluate what keywords you use and when you include them in your ads.
Now as all this is clear, let’s proceed with our next step and use the right keywords for your campaign.
STEP 15: Pick the keywords you prefer and enter them in your ad group.
You might think that just adding keywords is enough. But do you know that you can do a lot more with the keywords you entered than just hoping for your ads to be displayed for those keywords?
In case you didn’t notice, there are match types that you can enter for each of the keywords you planned to add to your ad group.
Before we move on to the next step, let’s understand what ‘match types’ are.
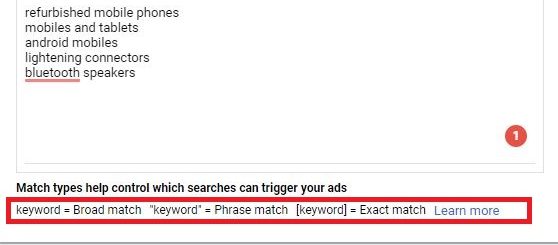
Keyword Match Types
People don’t search for exactly the same terms that you have included in your ad and that’s okay because different people have different styles of searching for the same thing.
Let’s say I want to purchase a wall hanging for my new apartment. Where one person may search for ‘Cheap wall hangings online’, other person might search for ‘Branded wooden wall hangings for new apartments’.
It’s obvious that you can’t stick to just a single keyword type and expect people to find your site, right? Targeting different keywords and search terms needs to be your goal if you want to make your ad more effective and encourage more sales and that’s where keyword match types come into the picture.
There are three types of keyword match types that you can settle for.
Broad Match – Broad match is a good option if you want to target all such keywords that are similar to your chosen keywords. As the name suggests, there’s a chance that your ads are going to be shown for keywords that are partially similar to the keywords you have chosen, even synonyms. Your ad is eligible to be shown for different combinations of the same keywords that you have chosen.
Suppose your main keyword is ‘affordable wall hangings’. Your ad is going to be displayed for similar keywords, such as ‘cheap wall hangings’ or ‘buy wall hangings at best prices’. You get the point.
To specify broad keywords in your ad group, leave them as they are.
Phrase Match – If you want more control over your ads and the keywords displayed, a phrase match is a right option for you.
This keyword match type is quite simple to understand. Suppose you are displaying a couple of keywords in your ad. With a phrase match, your ad would be displayed only for the people that search for that very keyword and in that very order of words. However, it could be accompanied by a set of other words as well.
Let’s say, our main keyword is ‘wooden wall hangings’. Our ad is eligible to be shown to people searching for keywords like ‘affordable wooden wall hangings’ or ‘wooden wall hangings at best prices’. The main keyword isn’t changed, but it could have extra words in between.
To specify phrase keywords in your ad group, add quotation marks “” around them. Like “wooden wall hangings”
Exact Match – Our final keyword match type is the Exact Match which is actually a great option if you want to narrow down the search of your ads to a set of exact keywords that you specify.
Suppose you have a wall hanging store in NYC (let’s keep it precise and keep it as 5th street, NYC) and just want our ad to be shown to people searching for that exact keyword.
So, we would use an exact match keyword type. This means that if our keyword is ‘Wallhanging stores on 5th street, NYC’, our ad is eligible to be shown to only those people who search for this exact term.
While this may be a good option, it still isn’t as accurate as you would want it to be.
To specify exact keywords in your ad group, add square brackets [] around them. For eg. [wallhanging stores on 5th street, NYC].
STEP 16: After setting your keyword match types, click on ‘Save and Continue’.
STAGE 4: CREATING AND FINALIZING YOUR ADS
This is (almost) the last phase involved in your ad creation. In this phase, you create a few ads (Google recommends three) around the keywords and details you entered in the last few stages.
So, let’s finish our ad creation.
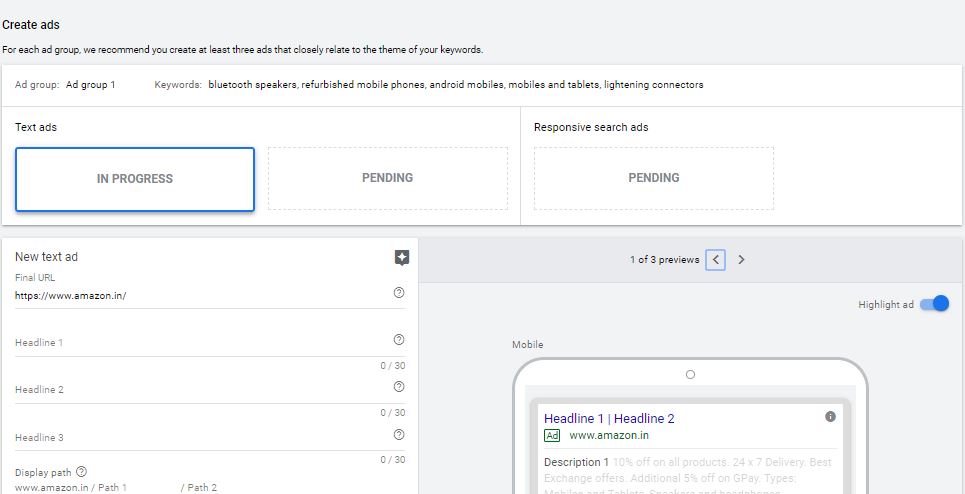
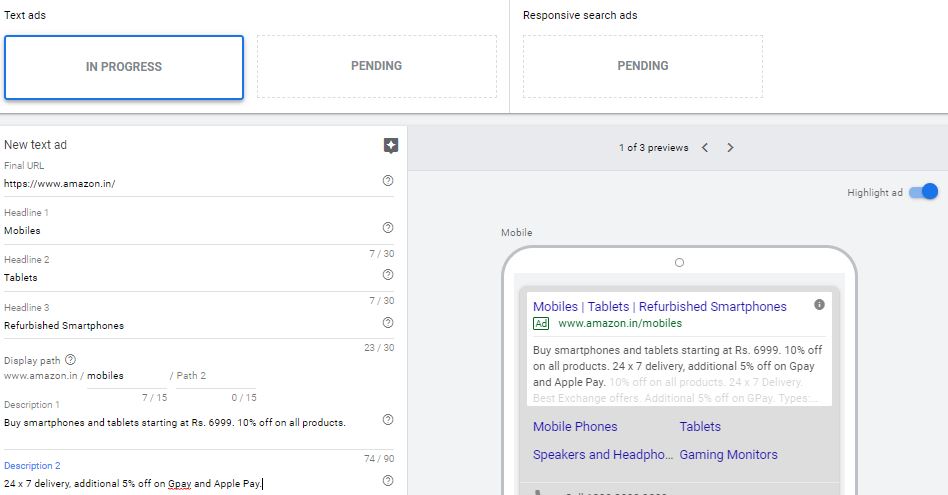
STEP 17: Create a text ad.
Text ads are common in the Google Ad display network. They load faster and are responsive to all kinds of devices you use.
For creating text ads, we have to enter a few details like:
- Final URL
- Headline 1, 2 and 3
- Display Path
- Description 1 and 2
Just fill in the details of your ad and proceed to create the next ad.
Since our first ad is created, let’s move on to the second one.
Note: Even if you don’t fill in the description for your ads, Google would generate them from the previous steps by default.
After creating the second and third ads, you can review your ads and check if they need any changes whatsoever.

Note: For a good ad rotation, you can add more than just 3 ads. This helps your ads to be displayed to more people and around more keywords.
You can also go back in time at any time and edit the details of your ad.
STAGE 5: REVIEW AND PUBLISH YOUR CAMPAIGN
This is literally the last step of your ad creation.
After you have done everything and finalized the details, the last step is to review your settings.
STEP 18: If you have followed all the steps correctly, you would be presented with all the details of your ad. Review them.
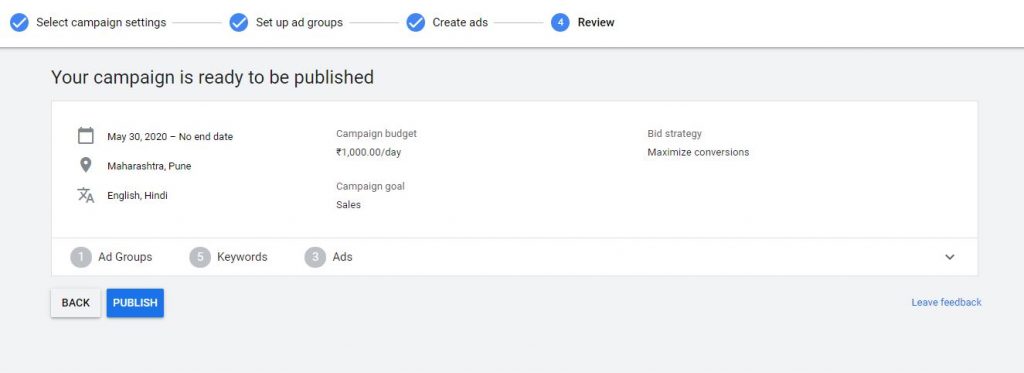
Here, a few important elements of your ad would be displayed that include:
- Start and End date
- The target location of your ad
- Language(s) you ad is served in
- Your campaign budget
- Your campaign goal
- Bidding Strategy
- Total number of ad groups
- Number of keywords you are targeting
- The number of ads you have created.
STEP 19: If everything is fine for you, click the ‘PUBLISH’ button.
After your ad is published, sit back and watch it perform well.
If you want to track the progress of your ad, you can go to your dashboard and click the ‘Overview’ button and track the performance of your ad group(s).
This concludes your guide to Google Ads!!!
OVER TO YOU
I really hope you liked this guide. Now I would like to hear from you.
If you have any concerns or queries that you would want me to answer, let’s talk in the comments!
If you want a more in-depth review of Google Ads and how you could use it to skyrocket your business, I recommend you even read our ebook on Google Ads.
If you like this post, I recommend you check out our other blogs, and join our community on Twitter, Instagram, and Facebook.